Halloween is the time for make up!
This site has a mom friendly ideas for creating that special costume look, with very easy steps.
Ghoul Skool is a few levels higher and has many other things to look at concerning costuming and make up. Be warned however, some links are dead.
Costume World has slide show type tutorials to explain the steps in their make up tips.
National Geographic has a video on the new trend of Halloween in Japan, a Green Guide to Halloween Make Up. and a story on Fair Trade Candy. Other articles include DYI for kids Pumpkin Carving with patterns! A DYI for kids, explaining how to make their own flying Witch, an article exploring the ritualistic killing of Black Cats, and lastly a fill in the blank Halloween Game for Kids Check out NatGeo., Some cool stuff in there.
Panacea 81 has video tutorials on Fabulous Eyes! This woman is adorable, very unpretentious and she demos her eye make up versions via her love of MAC cosmetics. Very dramatic! If you're looking for a dramatic eye effect for Halloween, she can set you up with something. Her videos take you step by step through over 176(!) different looks!
A great place to get Theatrical Make Up tips via video is Expert Village. Several videos to view there.
Multimakers's You Tube Channel has many video tutorials on Great Theatre Make up, seriously good "normal" physical ugliness (broken teeth, noses, bruising, bites, etc. and clear instruction.
Merely a flesh wound! Watch this video for (silent, but)clear instruction on making prosthetic wounds that actually flex like the real thing! eeek! Thanks Makinthisnthat!
Theassassinnox demos "Cats"style Theatre Make Up, silently with a nice music background, easy enough to figure out what she is doing by watching.
Ayabaya offers a silent you tube video of an actual Maiko or Geisha applying her make up...remarkable.
Askmemakeup demos a you tube Marie Antoinette, hair and make up!
BenjaminChu demos a true DYI "burn and scars" using rubber cement, magic markers and the imagination of a bored teenager. This kid has a career ahead of him!
Ford Model's hair artist Johnny Lavoy demos anAmy Winehouse do. Simple. Really! Also a great Gwen Stefani pony tail. Hot 40's look!
Marie Antoinette
This guy shows a very quick video tutorial substituting theatre make up plastics with bubble gum! to make those same scars!
Professional Artist, Kevin Haney applies Frankenstein make up done from start to finish for a show that was supposed to tribute the original make up artist for Frankenstein, Jack Pierce. Unfortunately the show was canceled last minute and he never got to see his "work".
How It's Made shows us how professionals make face prosthetics turning a beautiful 28 year old woman into an 80 year old version of herself. Start to finish it would cost up to $10,000. Cool video.
And these two videos from "The View" showing us how the Ladies get their Halloween looks from their hair and make up teams.
Tuesday, September 23, 2008
Halloween Make Up Links


Tuesday, April 8, 2008
Super Toddler Craft - Dry Pasta Dying
This is a great project. Fast, easy, CHEAP, and really fun! Grab your cute little person and have them help you make some cool coloured pasta to use in crafting, art projects, school assignments or even to enhance a lesson through art.
A few ingredients, all found in your cupboard, and you'll be supplied with beautiful "beads" or pasta shapes.
Plus, a super cool SAFE threading needle that will help tiny fingers collect beads onto their strings with lots of success and little frustration.
This method will also work on rice! (Rice can be used for cool, vibrant "sand" paintings!)
Enjoy.
Thursday, March 27, 2008
Fool Proof Photo Wall Arrangement
Have you ever gone to hang a picture--- measured it, marked it and then, when it's finally on the wall, you stand back to admire your handy work only to be disappointed that it's just a few inches off? Grrrr! Me too!
A few years working in Model Homes I picked up some trade secrets. Let me show you how we did it perfectly every time! It's easy. It's fast. And most importantly -it works!
Tuesday, November 20, 2007
$40 Christmas Tree Tutorial
Basic Tree Design:
1. Prep all decorations prior to setting the tree up. Sort by colour and size.
2. Set the tree up in the place you want it be, rotate to fine the best "front" view. Secure to the wall with fishing line if needed to stabilize.
3. String lights to every limb if it is not pre-lit, plug in so lights are on during decorating.
4. If you are adding garland, beading, or long draped fabric or ribbons, add them now. With horizontal designs work from bottom to top, dividing the circumference of the tree into 6ths or 8ths. This will help you visually drape your beads, etc., evenly. Stand back every now and then so you can make sure the drape is also level. With vertical or diagonal designs work the tree from top to bottom, again, standing back often to make sure your design is how you want it.
5. Large floral arraignments should be added now. Most large "one focus" design your design will look best in the top 2/3rds of the tree. Crescent, and "S" shapes work very nicely, with the bulk of your materials in the center of both those designs, tapering towards the ends.
6. You're going to begin by adding the largest ornaments first, then work down to the smallest. Add ornaments either very balanced, or in specific groupings. If you are using bows of large floral as ornaments, this is the time to add them.
7. Stand back and observe how the tree is coming along. Look for holes or crowding. Rearrange if necessary.
8. Fill in with small ornaments.
9. Add final bows or tinsel.
10. Top tree with spire, angel, star or other ornamentation.
Tuesday, October 30, 2007
Last minute Halloween Goodness!
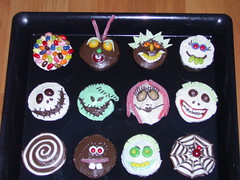
These two tutorials are a repeat from 2005, however they are pretty fun so here we go!
O.k. So this is the first run of cupcakes! I wasn't prepared for the decorations with special candies or frostings, but went ahead and came up with these little beauties with what we had on hand:
Dunked in Jelly Bellies, You're Bugging Me!, Spike, & Don't Forget to Floss.
Jack Skelington, Oogie Boogie, Sally, & Stock
High Anxiety, Buck, I only have eyes for you, & Miss Spider.
All cupcakes were chocolate with vanilla or chocolate frostings. I used Mega M&Ms, tiny M&Ms, Jelly Bellies, Life Savers, Sour Patch Strips, Green Apple Gum, Eclipse Gum, Jolly Rancher Rocks, and black Jimmies.
Frosting was applied via a zip lock bag snipped at one corner or with a butter knife. I also used a bamboo skewer to aid in the placement of many Jimmies! I am sure when I actually get out the cake gear and use the pro stuff they will come out even better. In the mean time, we're eatin' cupcakes for dessert tonight!
To view cupcake details more closely, click on the photo above. This will take you to my photo page at Flicker! Find the photo stream st the top right of the page and click the "next" photo, it should be titled: "I'm ready for my close up!" double click. It will come up full screen and with much better detail.
For an older tutorial on making CHEAP and easy tombstones click: Tombstones. Scroll down to the tombstone photos and follow the instruction beginning with "a" and finishing up with "g".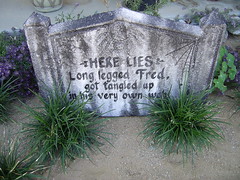
In the "spirit" of Halloween, I spent the afternoon in quiet solitude and carved up some fun! The undertaking? Tombstones!
This is the first of the new tombstones for this year. (2005) This one is 24" wide by 16" high and is made from 1" thick foam board insulation that comes in a variety of sizes. I chose the 4'x8' sheets. About $12.00 out the door and into the minivan.
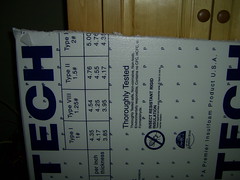
If you are like S'mee, you will need to have the guys on the floor cut it into 2 pieces for you (so it can fit in your vehicle). As you can see in the photo, there are indeed "lines" that one could follow -if they wished to do so- the guys I was working with at the time were less than cooperative and decided to "freehand" it on the totally white side without marks and guidelines. UGH! and GRRR!
Make sure you stress the first cut along the lines, otherwise, like S'mee, you will lose one inch, or more, when they cut it diagonally. again UGH!
O.k. so click on that Flickr! link and get started, seriously, if you work in assembly line fashion, this only takes a few hours and you can whip out an entire graveyard!
Tuesday, October 23, 2007
Tutorial Tuesdays! Being Prepared
Hitting close to home, disasters that occur miles away can and will make our own lives and comforts displaced. In order for our family to feel secure, safe, and self reliant we need to become prepared.
Insurance companies can and will 'put you up' in a motel for an average of three weeks. (If your home burnt down would it be rebuilt in three weeks?) Not the four seasons, a motel... the cheapest motel they can find in your area, meaning within a half hour of your home. After three weeks it gets sketchy. FEMA; well just think Katrina and understand that they too try hard, but fall short of being a real help to 99% of people in a disaster. Recent studies tell us that scientists, fire fighters, and government agencies believe that 99% of major earthquake victims will be doctoring/rescuing each other rather than official agencies do to their limited resources. Do you know how to rescue yourself and others?
The following is a 12 week program that can help us begin to store and build a 72 hour emergency kit for each member of our family. Thor and I were able to gather all these supplies (and even more!) with little or no money, just squirreling away items we were able to find in the house already and setting them aside. (at the very bottom of the page is a list of items for a very BASIC 72 hour survival kit in a #10 can... think survival kit.)
We each used a back pack, and then combined some items in a new large paint barrel with a sealed lid that we purchased for $3.00 from our local paint store. In addition to these 72 hour kits, we also made minimal basic 72 hour kits in a #10 can to be stored in the car and office in case there is a situation that causes us to live in on of those for a few days.
Twelve weeks to a full kit:
Week 1: BACKPACK - a duffel bag, rolling suitcase, bucket, whatever! Some form of storage for each member of the family.
Week 2: WATER: One gallon per person per day, plus water purification tablets. (think about the water in Louisiana after Katrina, plenty of water, just none you want to drink - also make sure to calculate and provide enough formula and water for the baby and or pets)
Week 3: FOOD & MESS KIT: Cereal, peanut butter, oatmeal, dry soup mixes, MREs, jam, juices, fruit cups, energy bars, dried fruit, nut crackers, PLUS a mess kit or utensils to cook with, manual can opener, ziploc bags. (Again, remember the baby/pets/special diets and provide whatever those may require.)
You should store with meals in mind, however, BASIC meals for survival, not 'company/sit down' feasts. Store extra water if you are storing meals that need water in a recipe, such as soup. Store only those things you currently eat. If you don't eat MREs on a weekly basis don't store them. Also if you can find canned goods with the pop tops, that illuminates the need for can openers.
Week 4: FIRST AID KIT: alcohol, wipes, band aids, neosporin, moleskin, tweezers, nail clippers, medications, Rx meds. if you can, flashlight with batteries, sunscreen, bug repellent, sunglasses, etc. (Talk with your health care provider about storing one prescription ahead and rotate that out so that you always have a fresh dose. Special needs diets also will need consideration. Are there appropriate substitutes that you can store for an immergency?)
Week 5: CLOTHES & COMFORTS: 2-3 socks, underwear, change of clothes, t-shirt, pants, windbreaker, hat , sturdy shoes, (Thor and I packed all these plus sweat pants/shirt for layering. I put in our old used shoes that were still in good condition. They're broke in already and won't cause blisters.) , Comfort items: Scriptures, books, games, favorite toys, paper, pens/pencils/ crayons, music, etc. (um, I packed M&Ms and tootsie pops!)
Week 6: SNACKS: Cookies, crackers, hot cocoa, gum, hard candy, granola bars, fruit snacks. (maybe cheerios or other baby snacks)
Week 7: PERSONAL SANITATION: Soap, toothbrush, wash cloth, comb, hand towel, mirror, feminine products, toilet paper, hand wipes, shampoo, lotion, razors (I think if you have a baby you may want diapers and trash bags to keep the soiled ones in.)
Week 8: TOOLS: gloves, crescent wrench, ax, shovel, 1/2in coil rope, hammer, pliers, screw drivers, duct tape, pocket knife, sewing kit, etc. (Thor and I also have the instructions for shutting off the utilities..he may know, I may know, but whoever else is there may need the info., also a scout handbook comes in handy! Small camp tools are great and much easier to store than regular sized tools. Don't stress, just do what you can.)
Week 9: PERSONAL ITEMS: Copies of important papers (download to a thumb/zip drive), including i.d. cards, insurance papers, birth certs. passports, photos of the family, phone numbers, cd. of genealogy. You will also want cash in coin and bills (at least $20.00, but having as much as $500.00 will make you feel much more secure. No ATM machines? You'll need bills under twenty, and coin change.), a cd player with batteries or tape player. (a few years ago I video taped each room in the house, garage, and shed for insurance purposes. I opened closets, drawers and doors, to expose exactly what would need to be replaced in case of fire etc. I put that on a dvd and keep it with the kit. Keep your laptop charged and ready to go every night if you have to run out without notice.)
Week 10: WARMTH & SHELTER: waterproof matches (you can make your own by dipping regular wood matched into melted wax and allowing them to dry), tent/tarp (a plastic shower curtain can even be used as a ground cover), emergency reflective blanket (you can get these at camping stores), wool blanket/sleeping bag, poncho camp stove, fuel, pan/spoon, industrial strength garbage bags (these can be used as ponchos, potties, trash, or insulation among other uses. ) Buddy burners. (Odd to think about, however a fresh unused cotton tampon is a great fire starter; wrapped, small, contained and flamable!)
Week 11: COMMUNICATION: battery operated radio, whistle, maps (gps if you have one, and also a permanent black marker. This is creepy, but writing your ssi# name and other info on your arm is a good idea for i.d.-ing in the event of disorientation, being lost, or even death. Write this info on the backs of small children, just below their neck.)
Week 12: PET SUPPLIES: food, water, feeding bowls, leash, etc.
Like I said, most of these items we were able to just pick out of the cupboards. Others we had to go out and purchase. I decided not to take the entire 12 weeks to compile all of this stuff, but just get it over with! Even at that, it took a couple of days. So prepare!
Below are several websites that dedicate themselves to helping us prepare and get self reliant. PLEASE check them out and find out what is best for you and your family.
Provident Living The church website with great ideas and information.
Get Prepared The Red Cross website.
Plan Ahead The FEMA website, that yes, they weren't as prepared as they could have been during the whole Katrina disaster, however, they DO have great information that YOU can prepare with.
Project Noah This is a website developed to help a family prepare and store a year of supplies for under $5.00 a week over a years time. If you begin now, by next year this time you will have a YEAR of supplies!
BASIC SURVIVAL 72 HOUR KIT IN A #10 can FOR ONE PERSON:
Prepared items that can be stored in a #10 aluminum can, sealed, and set aside in a car or office, etc.. The items would provide sufficient nutrients and calories to sustain life over a three day period, minus fresh water. Sorry, couldn't find a way to get enough water in that can. All in all the items were gathered, and for $8.00, one could have a minimal survival kit of food. We're not talking luxury dining, but the very basic necessary for survival.
You can use a large coffee can, or any #10 can with a rubber or plastic lid. You can use packing tape to seal the seam and it should be "safe", if not the most fresh without a professional form of sealing.
Here's a list of what went inside:
Day one:
Morning: 1 hot cocoa, 1 bag of trail mix
Noon: 1 small can of tuna, 1 apple sauce
Evening: 1 granola bar, 1 cracker snack pack
Snack as needed: 3-5 pieces of hard candy
Day two:
Morning: 1 instant oatmeal, 1 apple cider drink
Noon: 1 dry fruit roll, 1 can Vienna sausages, 1 lemonade drink
Night: 1 granola bar, 1 beef jerky log
Snack as needed: 3-5 pieces of hard candy
Day three:
Morning: 1 bag of trail mix, 1 hot cocoa
Noon: 1 cracker snack pack, 1 nut mix pack, 1 beef jerky roll
Evening: 1 granola bar, 1 apple sauce
Snack as needed: 3-5 pieces of hard candy.
This menu requires four cups of water, and provides vitamin C, fiber, carbs, fats, and sugars. We also strongly urged the families to have water stored, enough for each family member's daily requirements.
We also suggested adding a pack of chewing gum to the outside of the can for tiding hunger pangs. We secured a small can opener to the top of the can, and added the menu and expiration dates of food items on the side of the can.